

| Item | Quantity / Dimensions | Est. Cost |
| Silicone caulk | 2-3 tubes, 10 oz each | $4.00 to $6.00 per tube |
| Steel wool pads | 1 package, 12 count | $3.00 to $5.00 |
| 1/4-inch hardware cloth | 10 sq ft, 36-inch width | $12.00 to $15.00 |
| Door sweeps | 2-3 units, 36-inch standard | $8.00 to $15.00 each |
| V-strip weatherstripping | 25-foot roll, 1/2-inch width | $6.00 to $10.00 |
| Caulk gun | Ratchet rod style, 1 unit | $5.00 to $10.00 |
| Utility knife | Retractable blade, 1 unit | $3.00 to $5.00 |
| Work gloves | Nitrile or leather, 1 pair | $2.00 to $4.00 |
How to Pest-Proof Your Home Before an Infestation Starts
Pest-proofing your home requires sealing every opening larger than 1/4 inch, eliminating accessible food sources, and maintaining vegetation-free perimeters around your foundation. These three actions form the core of residential exclusion. Effective pest control begins with physical barriers, not chemical treatments. Homeowners asking how to pest proof home structures need a systematic protocol. Homeowners seeking the best way pest proof house strategies succeed through consistent exclusion. The best way to pest proof house structures involves sealing, storing, and scheduling.
A single unsealed utility penetration provides mice with direct access to wall cavities, insulation, and pantry areas. Gaps around dryer vents, plumbing stacks, and electrical conduits create direct pathways from exterior soil to interior food stores.
This guide delivers a room-by-room inspection protocol that transforms your home into a sealed structure pests cannot penetrate. Homeowners who complete these steps before infestation starts keep pests out permanently without relying on recurring chemical applications.
Identify Common Entry Points
Identifying common entry points reveals where rodents, insects, and arachnids access residential structures. A thorough structural vulnerability assessment starts at the foundation and moves to the roofline.
According to the National Pest Management Association, mice squeeze through gaps as small as 1/4 inch, roughly the diameter of a dime. Insects exploit cracks in foundation mortar, window frames, and soffits. Utility penetrations for pipes, wires, and dryer vents create hidden highways into wall cavities. Garage door bottom seals degrade within 2 to 3 years. Garage door gaps exceed 1/4 inch when these seals fail. Attic vent screens corrode within 5 to 7 years in coastal climates. see our guide to crawling insects and hidden home pests.
Foundation and Exterior Walls
Inspect foundation walls for cracks wider than 1/8 inch. Check mortar joints between bricks for separation. Examine weep holes for missing covers. These common entry points allow ants, spiders, and mice to transition from soil to framing.
Doors, Windows, and Vents
Test weatherstripping compression by closing a door on paper. Inspect screen mesh for tears larger than 1/4 inch. Verify attic vent covers remain intact. Seal entry points at these zones before pests establish interior pathways. What are signs of infestation? Droppings near baseboards, gnaw marks on packaging, and grease rub marks indicate active rodent passage.
Seal Cracks Around the Foundation and Walls
Sealing cracks around the foundation blocks pest access at the structure’s most vulnerable level. Building envelope integrity depends on continuous physical barriers at every penetration.
Caulk and Sealant Selection
Silicone caulk lasts 20 or more years outdoors and remains flexible through temperature swings. Acrylic latex shrinks within 12 months and requires annual replacement. Polyurethane expands to fill irregular voids. Seal foundation cracks under 1/2 inch with silicone caulk. Apply hydraulic cement or expandable foam for larger cracks. How to seal entry points starts with selecting the correct material for each gap size.
Vent and Weep Hole Protection
Cut 1/4-inch hardware cloth to overlap weep holes and vents by 1 inch on all sides. Secure with exterior-grade adhesive or galvanized screws. Install mesh over vents to block rodent entry while maintaining airflow. Rodent proof house strategies begin with metal barriers at ground level.
A January 2024 basement inspection revealed mice had gnawed through deteriorated foam sealant around a PVC pipe. Replacing that foam with steel wool packed in silicone eliminated the entry point within 48 hours. Seal gaps around pipes with steel wool before caulking to prevent rodent gnawing. Keep rodents out of house interiors by packing steel wool into every utility penetration. How to rodent proof your house includes this steel wool technique at all pipe entries.
Safety Note: Wear nitrile gloves when handling steel wool. Work in ventilated areas when applying solvent-based sealants. Never block combustion air vents. How to seal cracks foundation: remove debris, apply hydraulic cement, and allow 24 hours to cure.
Weatherstrip Windows, Doors, and Garage Openings
Weatherstripping windows, doors, and garage openings closes the transitional gaps pests exploit daily. Perimeter defense strategies focus on these high-traffic access zones.
Door Sweep Installation
Measure the door width from jamb to jamb. Cut the sweep to fit with a hacksaw. Mount the sweep with screws, not adhesive, to withstand rodent pushing. Install door sweeps to block 1/4-inch gaps under exterior doors.
Window Weatherstripping
Remove old material completely from sash channels. Clean channels with mineral spirits to remove residue. Apply V-strip or compression seal along the sash perimeter. Weatherstrip windows doors by pressing the material firmly into the channel until it seats evenly.
Bottom seal replacement on sectional garage doors requires measuring the exact door width. Threshold adjustments close gaps caused by foundation settling. How to keep pests out home depends on these compression seals. How to seal gaps around doors includes adjusting the threshold plate when the gap exceeds 1/8 inch.
Eliminate Food Sources and Moisture Indoors
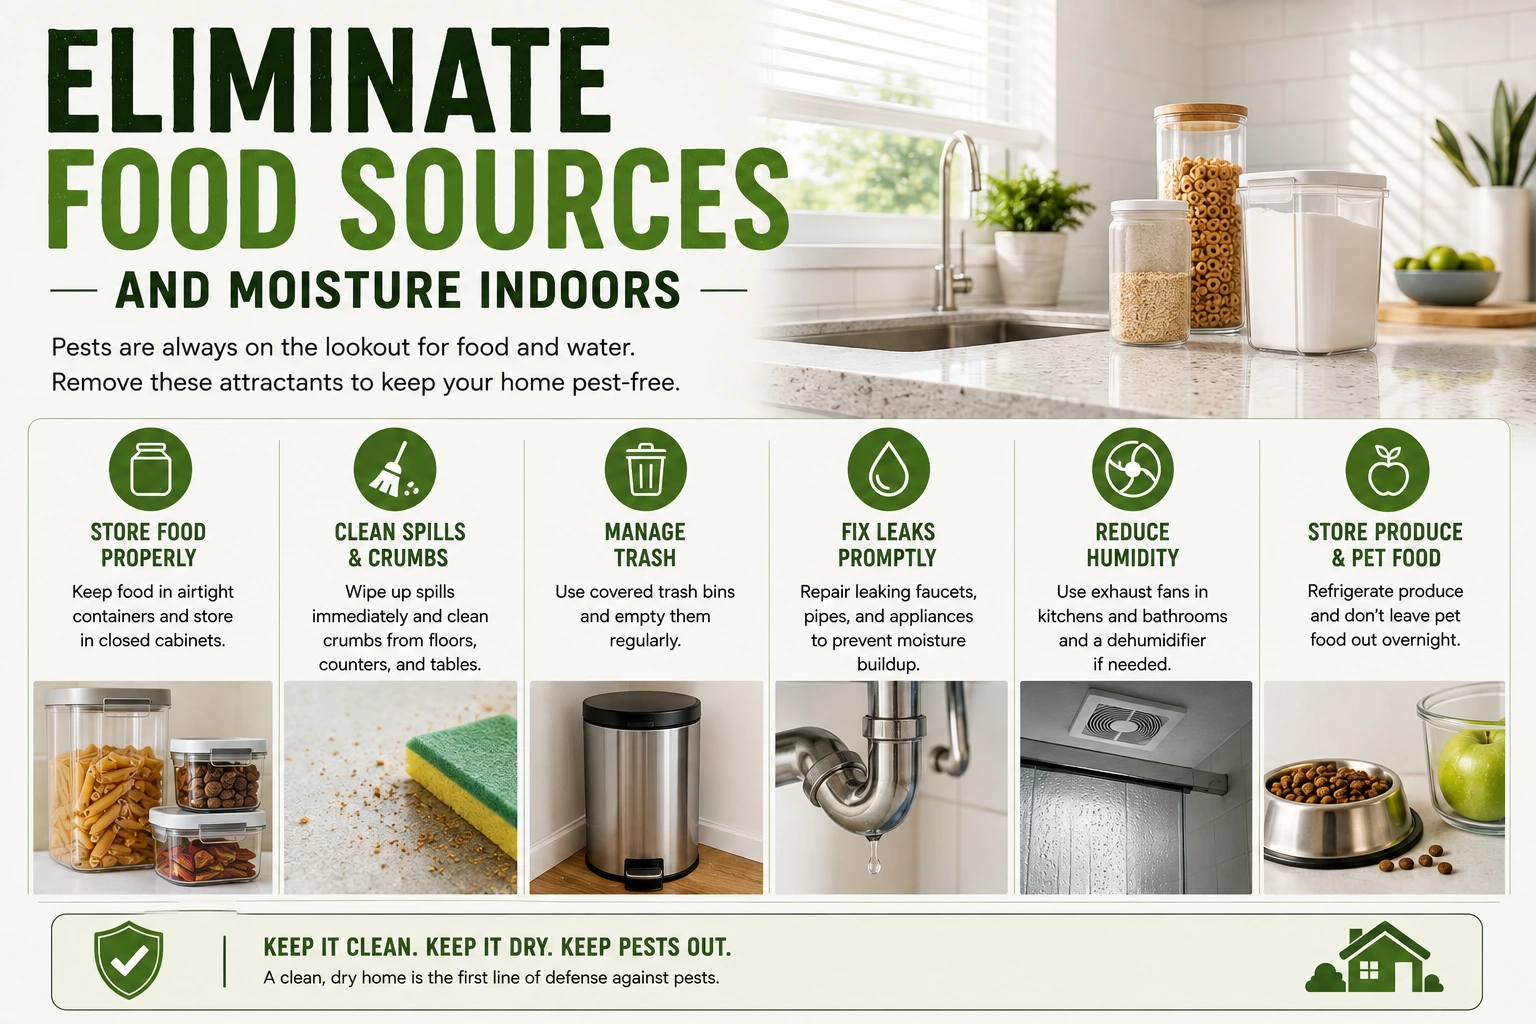
Eliminating food sources and moisture removes the interior attractants that override exterior barriers. Habitat modification inside the home forces pests to seek resources elsewhere. Home pest prevention succeeds when homeowners eliminate both food and water sources simultaneously.
Pantry and Kitchen Protocol
Transfer flour, cereal, and grains to sealed glass or thick plastic containers with snap lids immediately after purchase. Clean pantry shelves monthly to remove crumbs and spilled oils. Kitchen pest prevention requires storing pet food in airtight bins, not original paper bags. Wipe countertops nightly with soap and water to eliminate grease films that attract ants and cockroaches. If cockroaches are already present, see our cockroach types, identification, and hiding spots guide.
Moisture Control
Fix leaks under sinks within 24 hours of detection to prevent wood rot and mold. Empty pet food bowls after 30 minutes of serving. Maintain indoor humidity below 50% using dehumidifiers in basements and crawl spaces. Homeowners in humid climates along the Gulf Coast and Southeast must maintain indoor humidity below 50% year-round because moisture control indoors prevents silverfish, millipedes, and cockroach colonization. Arid climate residents in the Southwest focus primarily on food source elimination and water leak repair rather than humidity management. What attracts pests home includes accessible carbohydrates, proteins, and standing water in drip pans. Why do pests enter homes traces directly to these three interior resources.
Build a Preventive Maintenance Schedule
A preventive maintenance schedule converts one-time sealing into year-round protection. Integrated pest management relies on scheduled inspections rather than reactive treatments. These pest proofing tips convert one-time effort into year-round defense.
Seasonal Checklist
Spring focuses on exterior perimeter inspection after winter freeze-thaw cycles damage caulk and mortar. Fall focuses on interior seals and insulation gaps before rodents migrate indoors.
When to Call a Professional
Structural damage, recurring infestations despite complete sealing, or visible termite mud tubes require a licensed exterminator. Homeowners questioning professional pest inspection worth it find value increases when hidden colonies establish behind wall cavities.
| Season | Task | Frequency |
| Spring | Inspect foundation cracks and soffits | Annually in March |
| Summer | Trim vegetation, clean gutters | Quarterly |
| Fall | Replace weatherstripping, check attic vents | Annually in October |
| Winter | Inspect interior pipe gaps, pantry seals | Once in December |
Pest proof home spring protocols include checking for frost-heaved thresholds and cracked mortar. Homeowners asking how often pest proof home tasks need completion must inspect quarterly. Professional pest inspection services provide documentation for real estate transactions and insurance claims. Seasonal pest checklist completion takes 2 to 3 hours per quarter. When to call exterminator teams becomes clear when DIY sealing fails to stop activity after 14 days. Best pest prevention tips homeowners follow include this exact seasonal rhythm.
The Mistake That Undoes Every Pest-Proofing Job
Integrated pest management protocols place exclusion above chemical intervention in residential settings. Traps alone do not solve pest problems. This myth costs homeowners hundreds of dollars in recurring treatments while colonies continue expanding behind walls. Prevent home infestation permanently by sealing every entry point before deploying traps or deterrents.
Traps kill individual pests but do not stop colony entry. Chemical sprays inside homes expose residents to unnecessary toxins. Exclusion works without repeated chemical application. Pests reinfest homes with unsealed entry points regardless of interior trap count. DIY pest control fails when homeowners place traps without sealing access routes. DIY pest prevention home strategies must prioritize physical barriers over reactive killing devices. DIY pest control home prevention programs that skip exclusion waste money on temporary population reductions. Natural ways repel pests include peppermint oil and diatomaceous earth, but these supplements do not replace sealing. Natural ways to keep pests away require weekly reapplication and monitoring.
Safety Note: Indoor chemical foggers require evacuation for 4 to 6 hours and can trigger respiratory issues in children and pets. Physical exclusion eliminates this risk entirely. Stop pests before infestation starts by sealing entry points before deploying any traps or deterrents.
Frequently Asked Questions About Pest-Proofing Your Home
How do I pest-proof my home before an infestation starts?
Homeowners asking how to prevent pest infestation home must seal gaps larger than 1/4 inch with silicone caulk or steel wool. Store dry goods in sealed glass or plastic containers with snap lids. Maintain 6-inch vegetation clearance around your foundation. Inspect attic vents, crawl spaces, and utility penetrations every spring and fall before temperatures shift.
What are the most common pest entry points in a house?
Mice enter through gaps as small as 1/4 inch near utility pipes and dryer vents. Insects exploit cracked mortar joints, damaged window screens, and unsealed soffits. Garage door bottom seals and crawl space vents provide direct access to wall cavities, insulation, and pantry areas. Homeowners asking what are signs of infestation find droppings near baseboards, gnaw marks on packaging, and grease rub marks along walls near these entry points.
How often should I inspect my home for pests?
Inspect exterior seals every March and October. Check attic vents and crawl space screens annually for holes or corrosion. Replace weatherstripping every 5 to 7 years. Re-caulk windows and doors when visible gaps exceed 1/8 inch. Trim foundation vegetation quarterly to maintain 6-inch clearance.
Can I pest-proof my home myself, or do I need a professional?
Homeowners can seal gaps, install door sweeps, and eliminate food sources without professional help. Hire a licensed exterminator immediately for termite mud tubes, structural damage, or recurring infestations after complete sealing. Physical exclusion prevents common household pests including mice, rats, ants, and spiders throughout the year. For more information about identifying different household insects, see our complete bug identification guide.
What natural pest deterrents actually work for home use?
Peppermint oil repels mice temporarily but requires weekly reapplication to maintain effectiveness. Food-grade diatomaceous earth kills crawling insects on contact. These natural supplements complement physical sealing but do not replace essential exclusion methods, door sweeps, or proper food storage protocols.
Conclusion
Physical exclusion outperforms chemical treatments because it removes the conditions that attract pests rather than reacting to their presence. A sealed building envelope eliminates the entry points, food sources, and moisture pests require for colony establishment.
A sealed home delivers permanent protection without recurring service costs or indoor toxin exposure. Home pest proofing checklist protocols transform reactive homeowners into proactive defenders who inspect quarterly. Prevent pest infestation before starts by addressing foundation cracks, door gaps, and pantry storage this weekend. Download the seasonal pest-proofing checklist and inspect your home this weekend before temperatures drop.